Thoughts about ... the speedbar
Accelerator: "A mechanical device that allows the driver to increase the speed of his vehicle."
In paragliding, a speedbar has exactly the same function: to increase the airspeed of the aircraft. This accessory, which may frighten a new pilot, can also be a formidable ally in many cases. Like any tool, it is necessary to understand it, to learn how to use it properly and not to fear it unnecessarily. We will try to decipher how it works, the consequences on our wing's behavior, and finally when and how to use it.
I.- Some notions of aerodynamics ... :
In order to fully understand the operation of the speedbar and its effects in flight, it is important to appreciate certain aerodynamic concepts and in particular those relating to the velociy polar, the attitude and the angle of incidence.
I.1- Velocity polar :
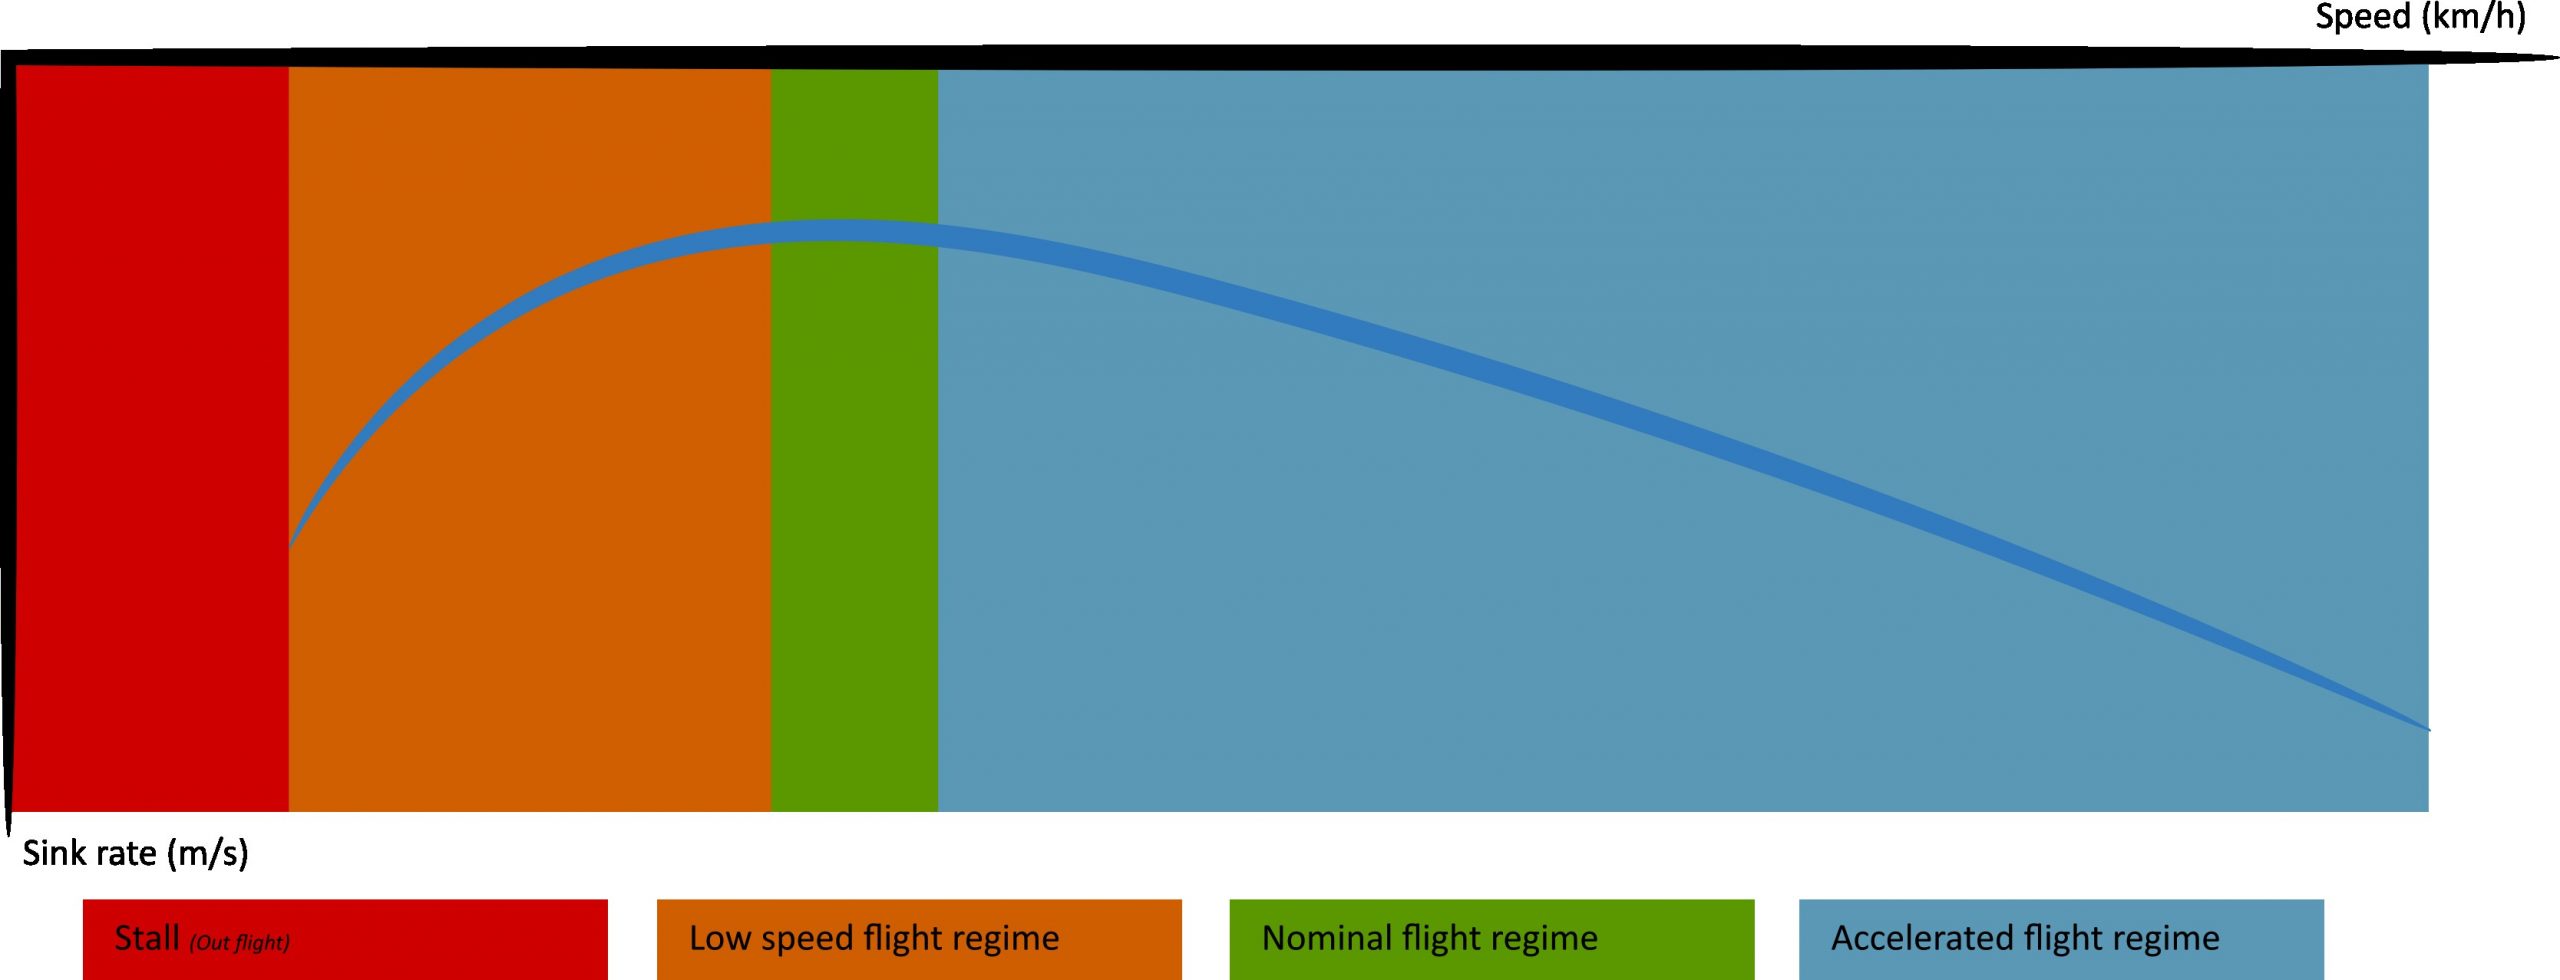
The velocity polar is a graph that describes the vertical airspeed as a function of the horizontal airspeed of an aircraft in stabilized straight flight (paraglider, hang glider, ...). This curve illustrates the different flight regimes of a wing, and to determine its overall performance within each regime: speed, sink rate, glide ratio. Even if its shape remains globally the same, one will notice some particularities according to the type of wing (leisure, performance, mini, ...) and the flight characteristics expected at design. We consider this curve as the graphic representation of the wing's performance. A good understanding of this curve will clarify the effects related to the use of the speedbar. We will focus on this curve, but without going into too much detail.
The different flight regimes are defined by an area on the graph below:
Notable points to remember are:
- Speeds higher than the minimum sink rate speed are called the "1st regime" (downward part of the curve).
- Speeds lower than the minimum sink rate speed are called "2nd regime" (rising part of the curve).
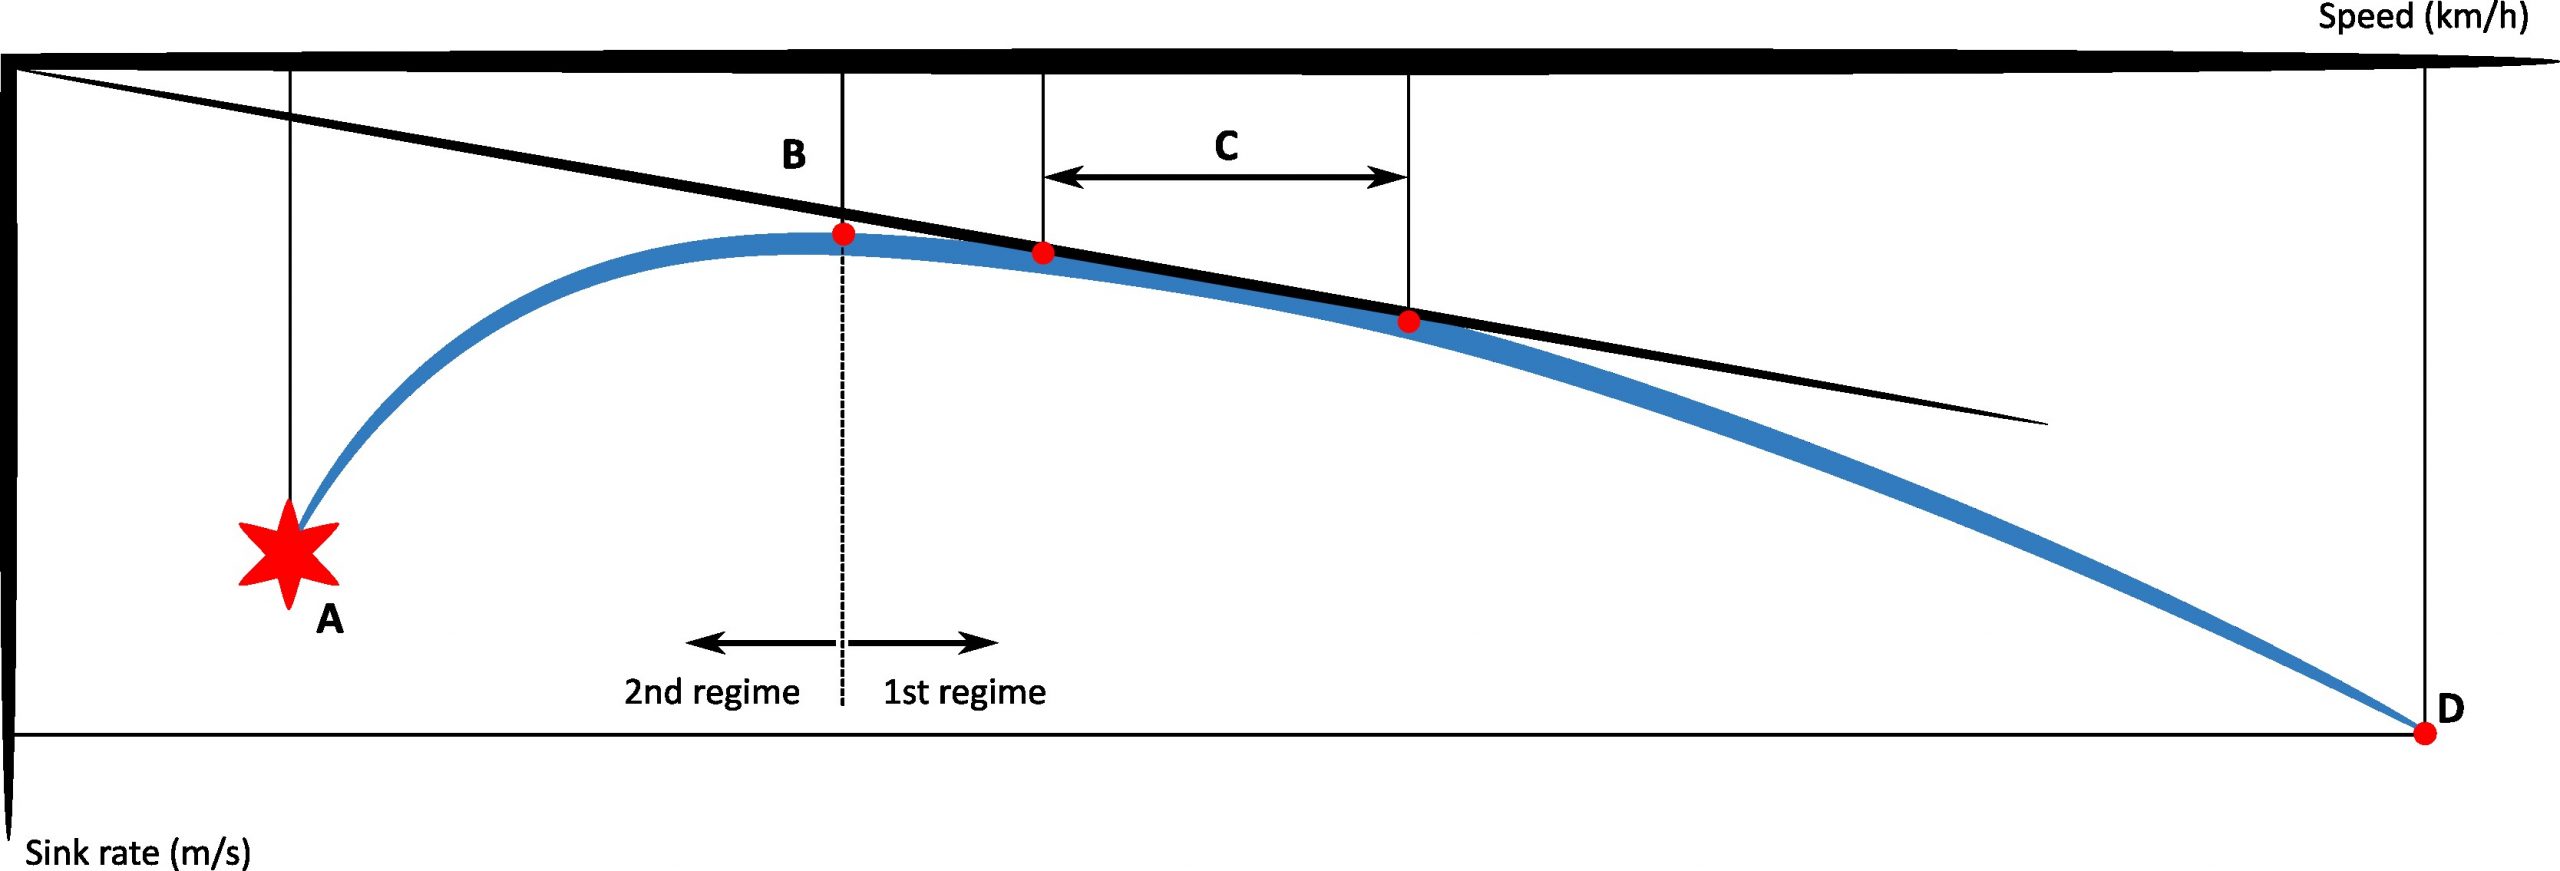
- The stall speed (Point A):
Located at the left end of the curve, the stall point corresponds to the minimum speed within flight envelope. Below this speed, the wing stalls and does not fly anymore!
- The speed corresponding to the minimum sink rate (Point B):
This is the highest point of the curve, located at the intersection of the curve with its horizontal tangent. We are on the flight regime with the lowest possible descent rate.
- The maximum glide speed range (Zone C):
Located at the junction of the straight line passing through "0" and tangent to the curve, this zone corresponds to the best possible glide for the designated wing. We will see later that this zone of maximum glide can be more or less important according to the wings, the polar can be assimilated to a straight line on a certain portion.
- Max speed (Point D):
Point located at the extreme right of the curve, it corresponds to the maximum speed that can be reached by the glider, after using all possible acceleration systems. There is no exit from the flight envelope just after this point, but we are approaching the acceptable limit for safety.
This polar tells us about the direct link between speed, glide ratio and sink rate (in other words: performance). The use of the speedbar must therefore be done with a good awareness of the interaction between these 3 parameters.
I.2- Attitude and angle of incidence :
To allow aerodynamic forces to come into play and make flight possible, it is necessary that the air streams from the relative wind attack the glider at a given angle: the angle of incidence. It is formed by the plane of the wing and the direction of the relative wind (also corresponding roughly to the air path of the paraglider). This angle is directly related to the glider's attitude, which is the angle between the wing plane and the horizontal.
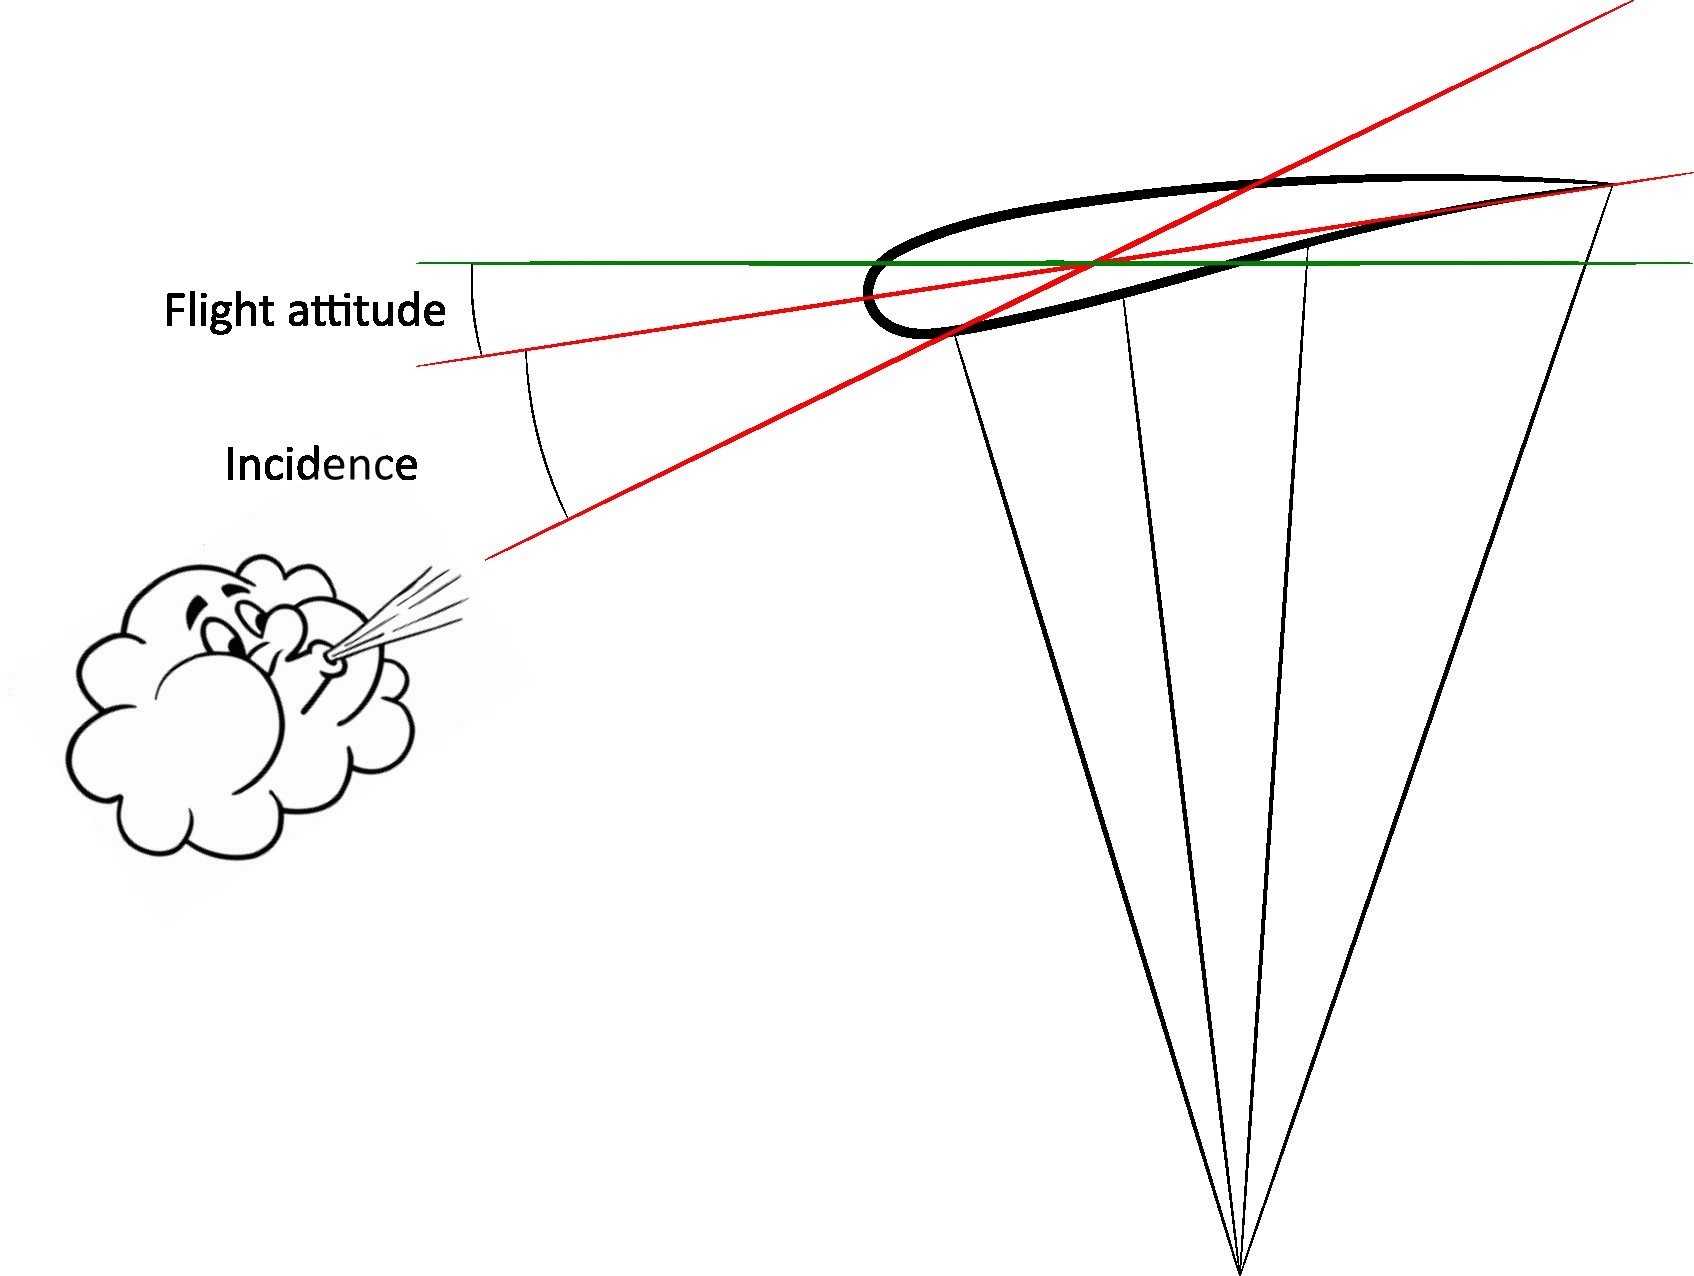
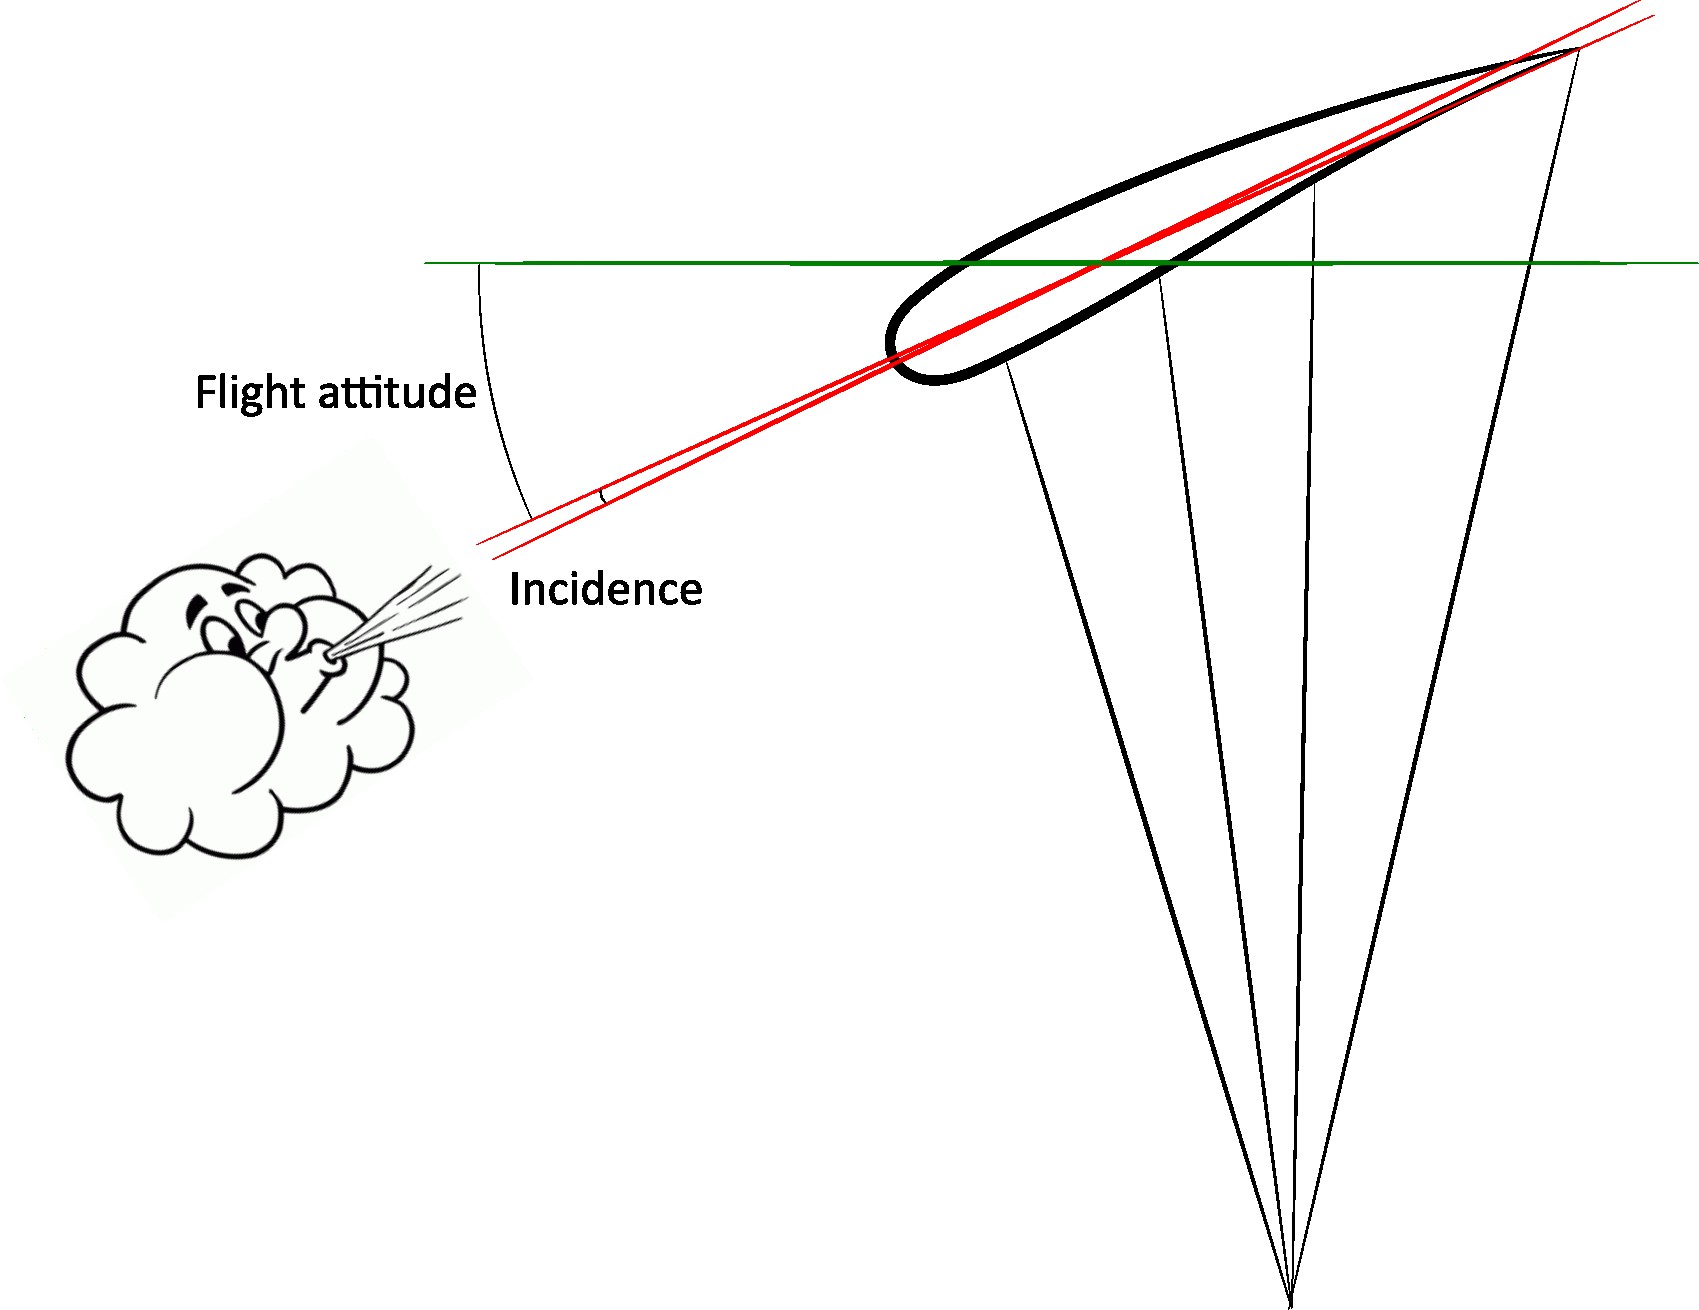
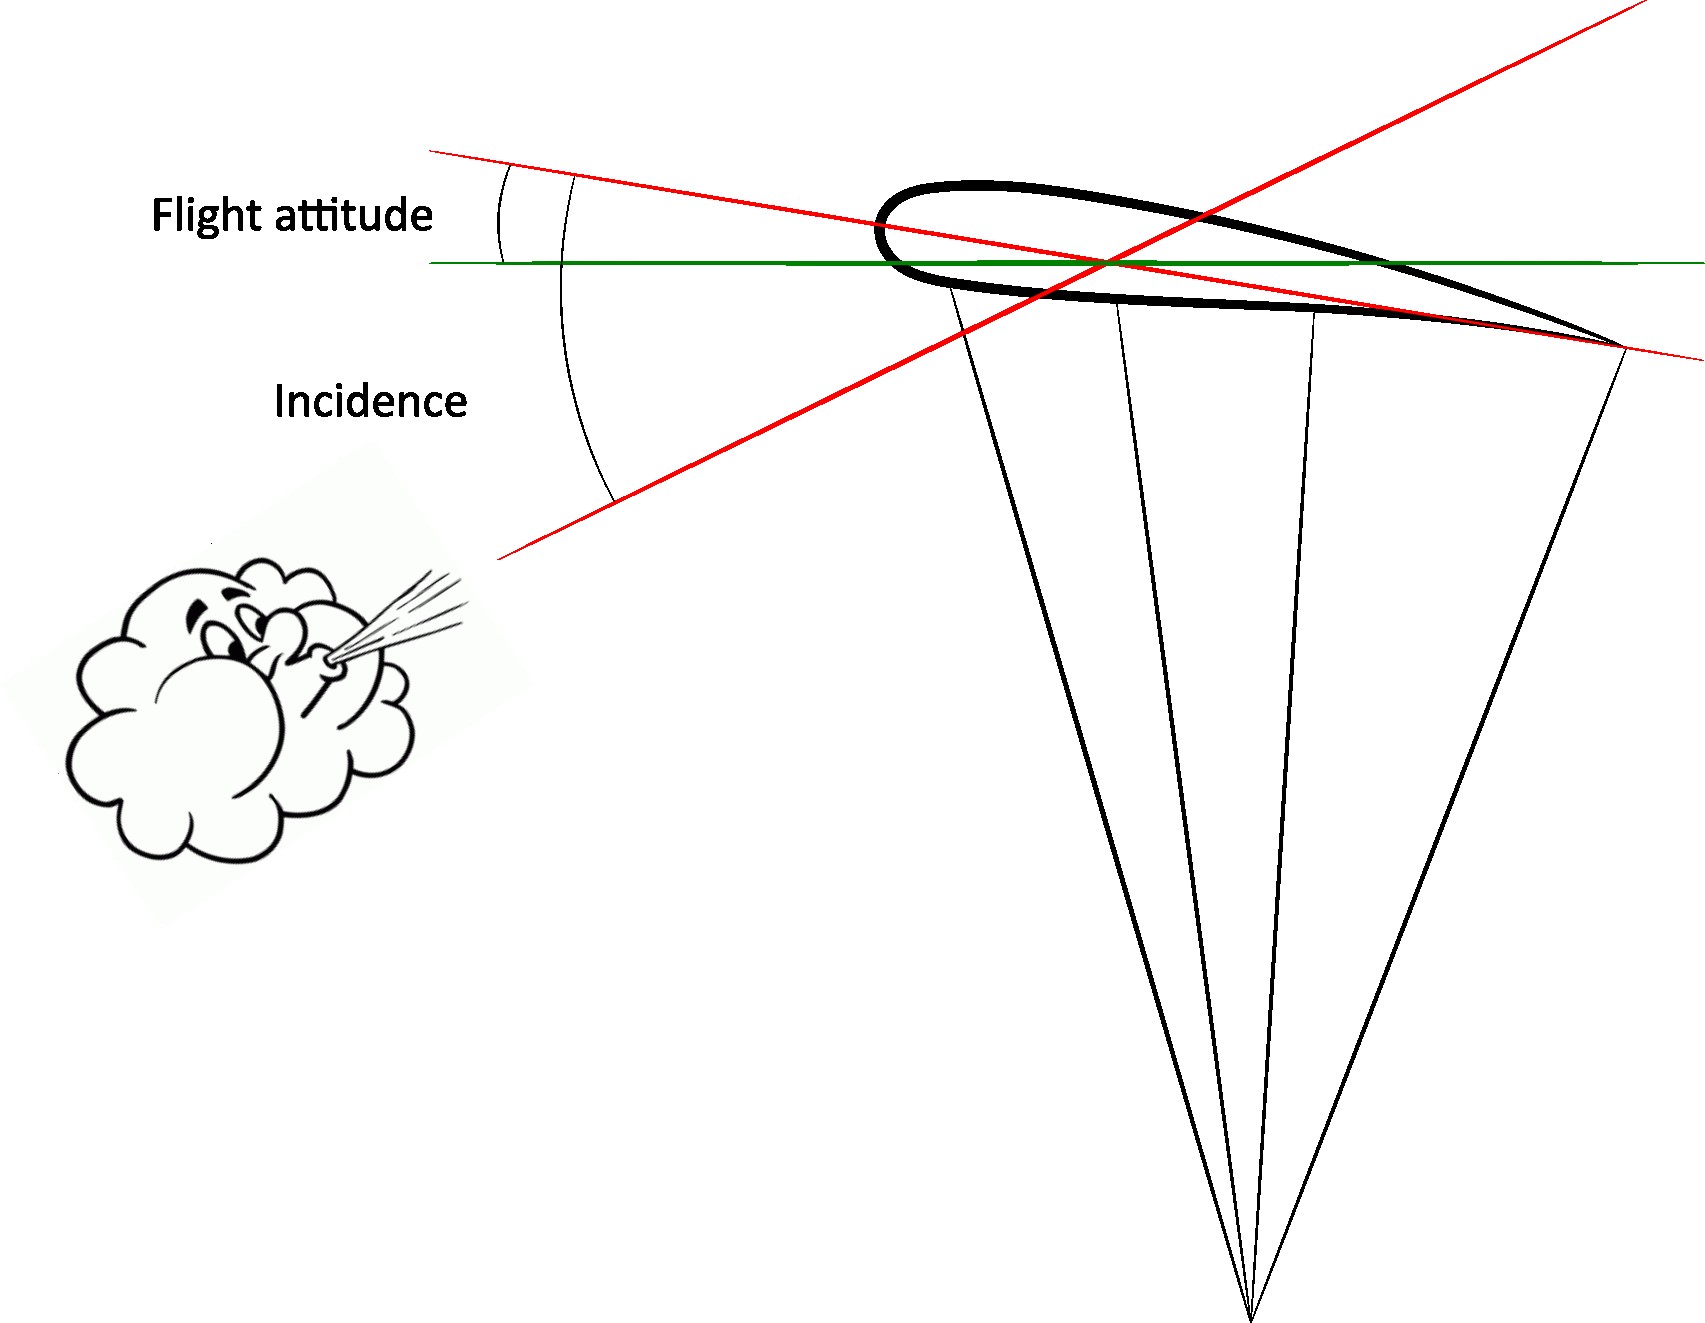
At the design stage, and depending on the purpose of each model (competition, acrobatics, school, cross country, ...), the designers calculate a pitch (and therefore an angle of incidence) which will define the nominal flight characteristics of the glider, i.e. without any pilot action. There is no standard for this setting: it is specific to each model of wing. We can find this "neutral" point on the polar, and determine the nominal parameters: cruising speed, sink rate and glide ratio. In general, on modern wings, this point is located at the beginning of the maximum glide area (Zone C), whether on recreational or performance wings. On mini wings or speed-riding/flying wings, this point may be a little further down the curve (between C and D), in which case it will be necessary to apply a good amount of brake to find the maximum glide.
II.- Speed up ...
Now that we have briefly reviewed the aerodynamic principles controlling a paraglider's speed, let's take a closer look at the "acceleration" aspect.
If we want to increase the speed of a wing, we will have to increase its angle of incidence to make it more nosey. To do this, there are now 2 systems: the foot speed bar, and trimmers. Both use the same principle: deform the risers to vary their relative lengths in order to modify the nominal pitch.
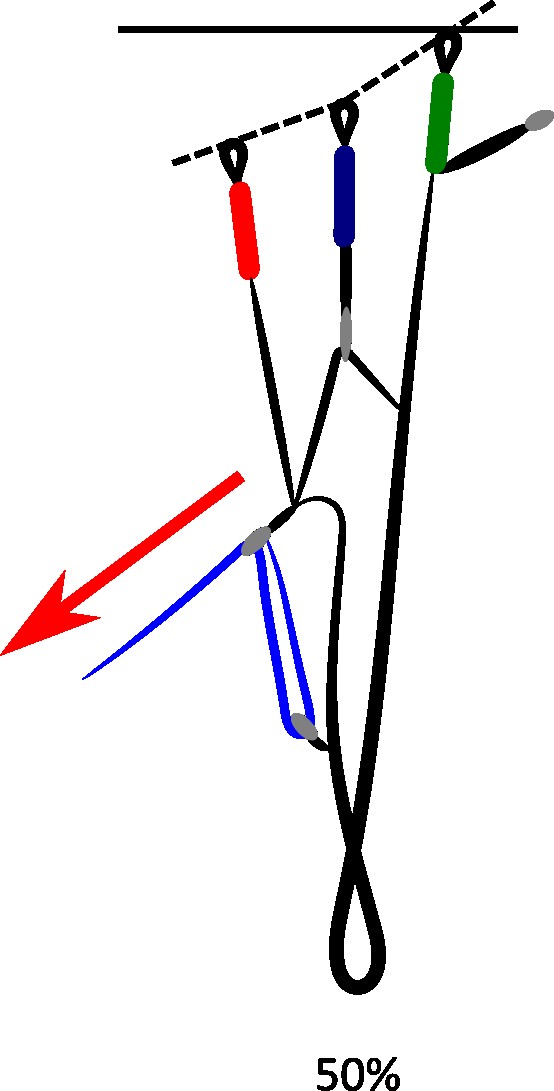
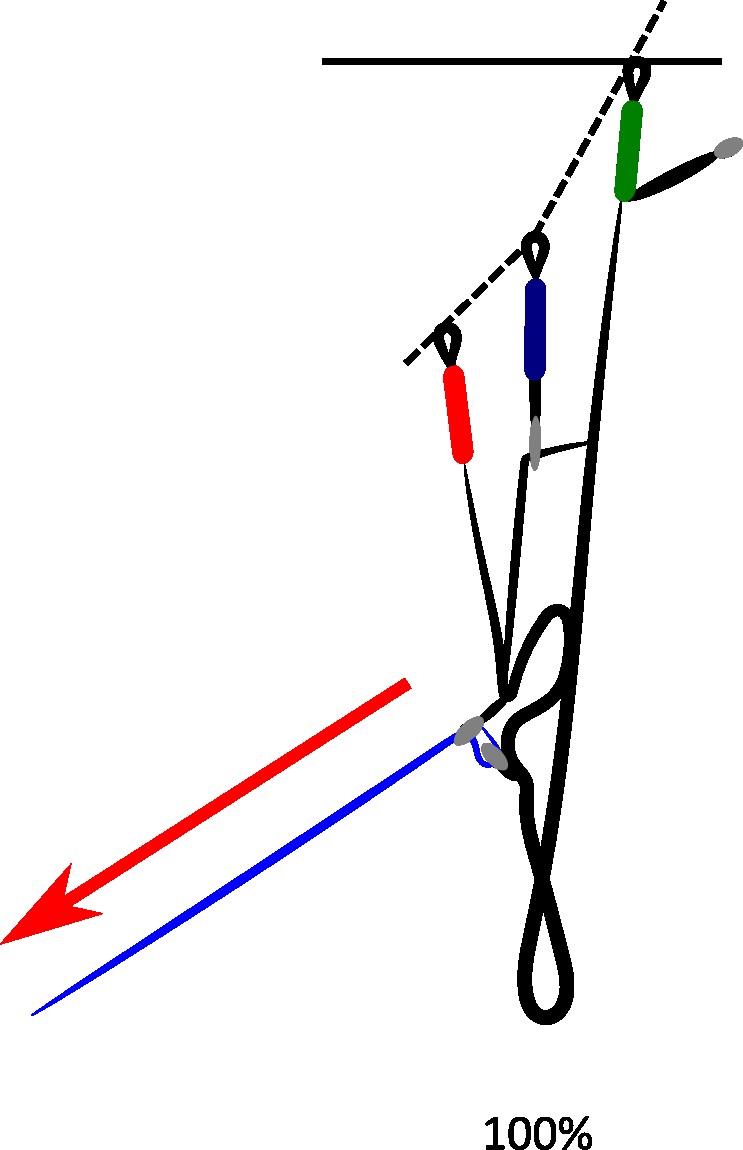
The speedbar is the most common device found on today's paragliders. It is made up of one or more rungs and is connected to the risers by a system of cords that slide through pulleys located on the sides of the harness. The principle remains the same for all harnesses, but it is up to you to find out about the potential specificities of your harness and the correct mounting of your speed bar. Don't hesitate to ask a professional if you have any doubts.
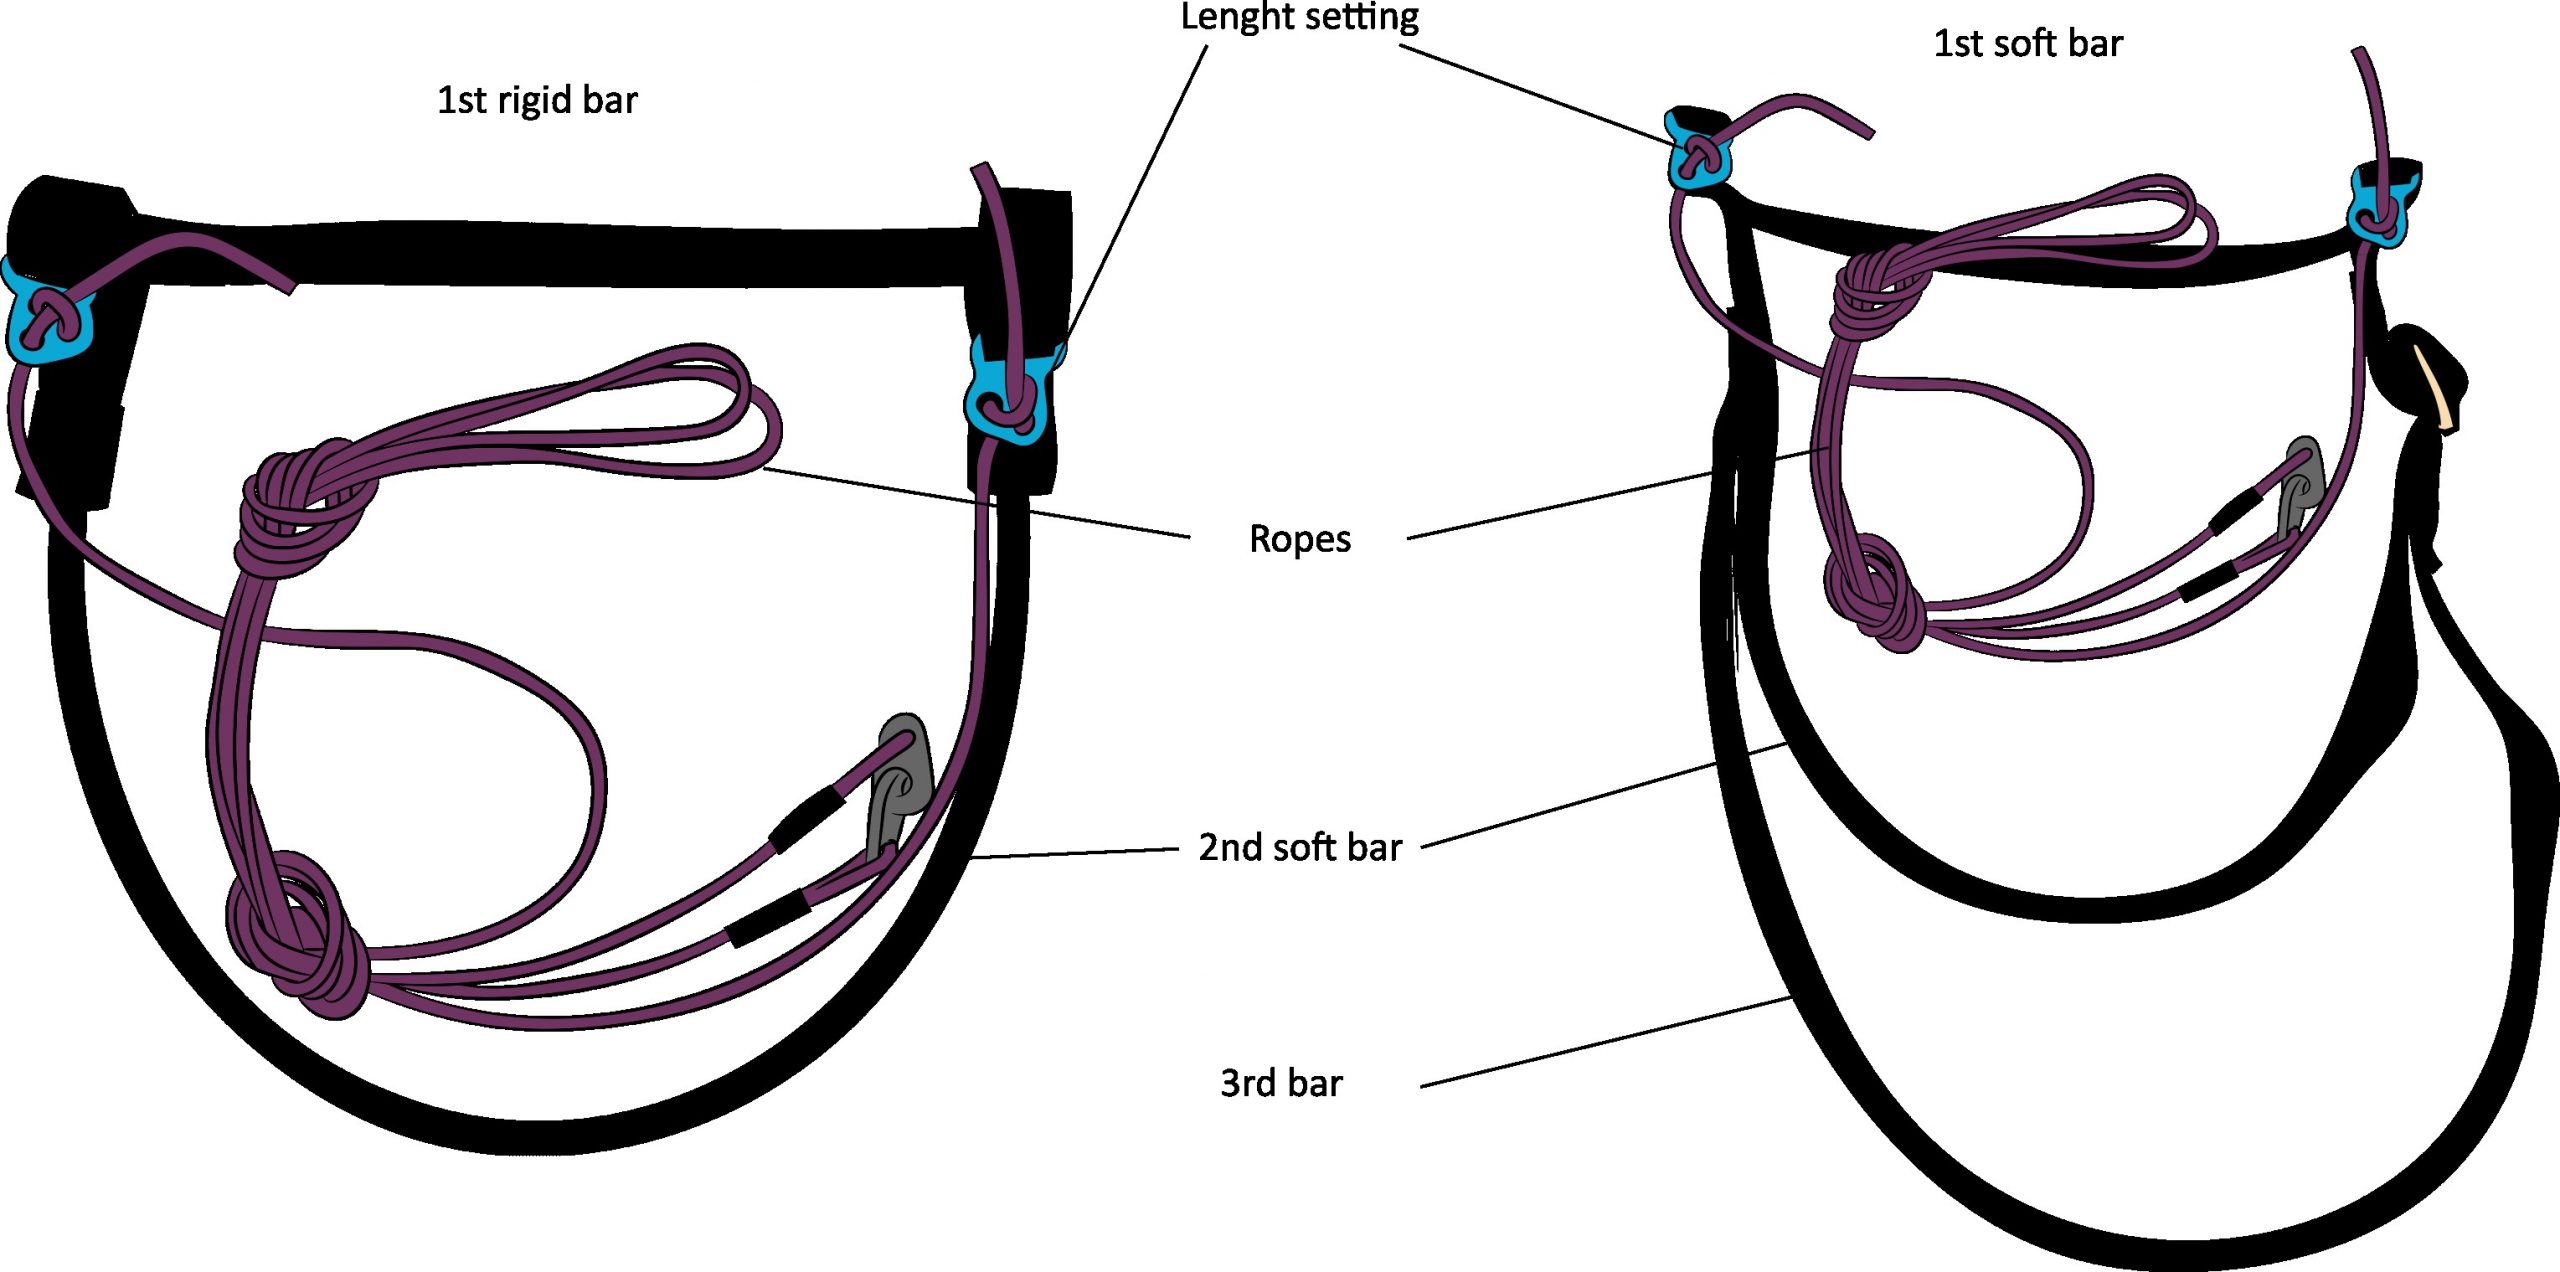
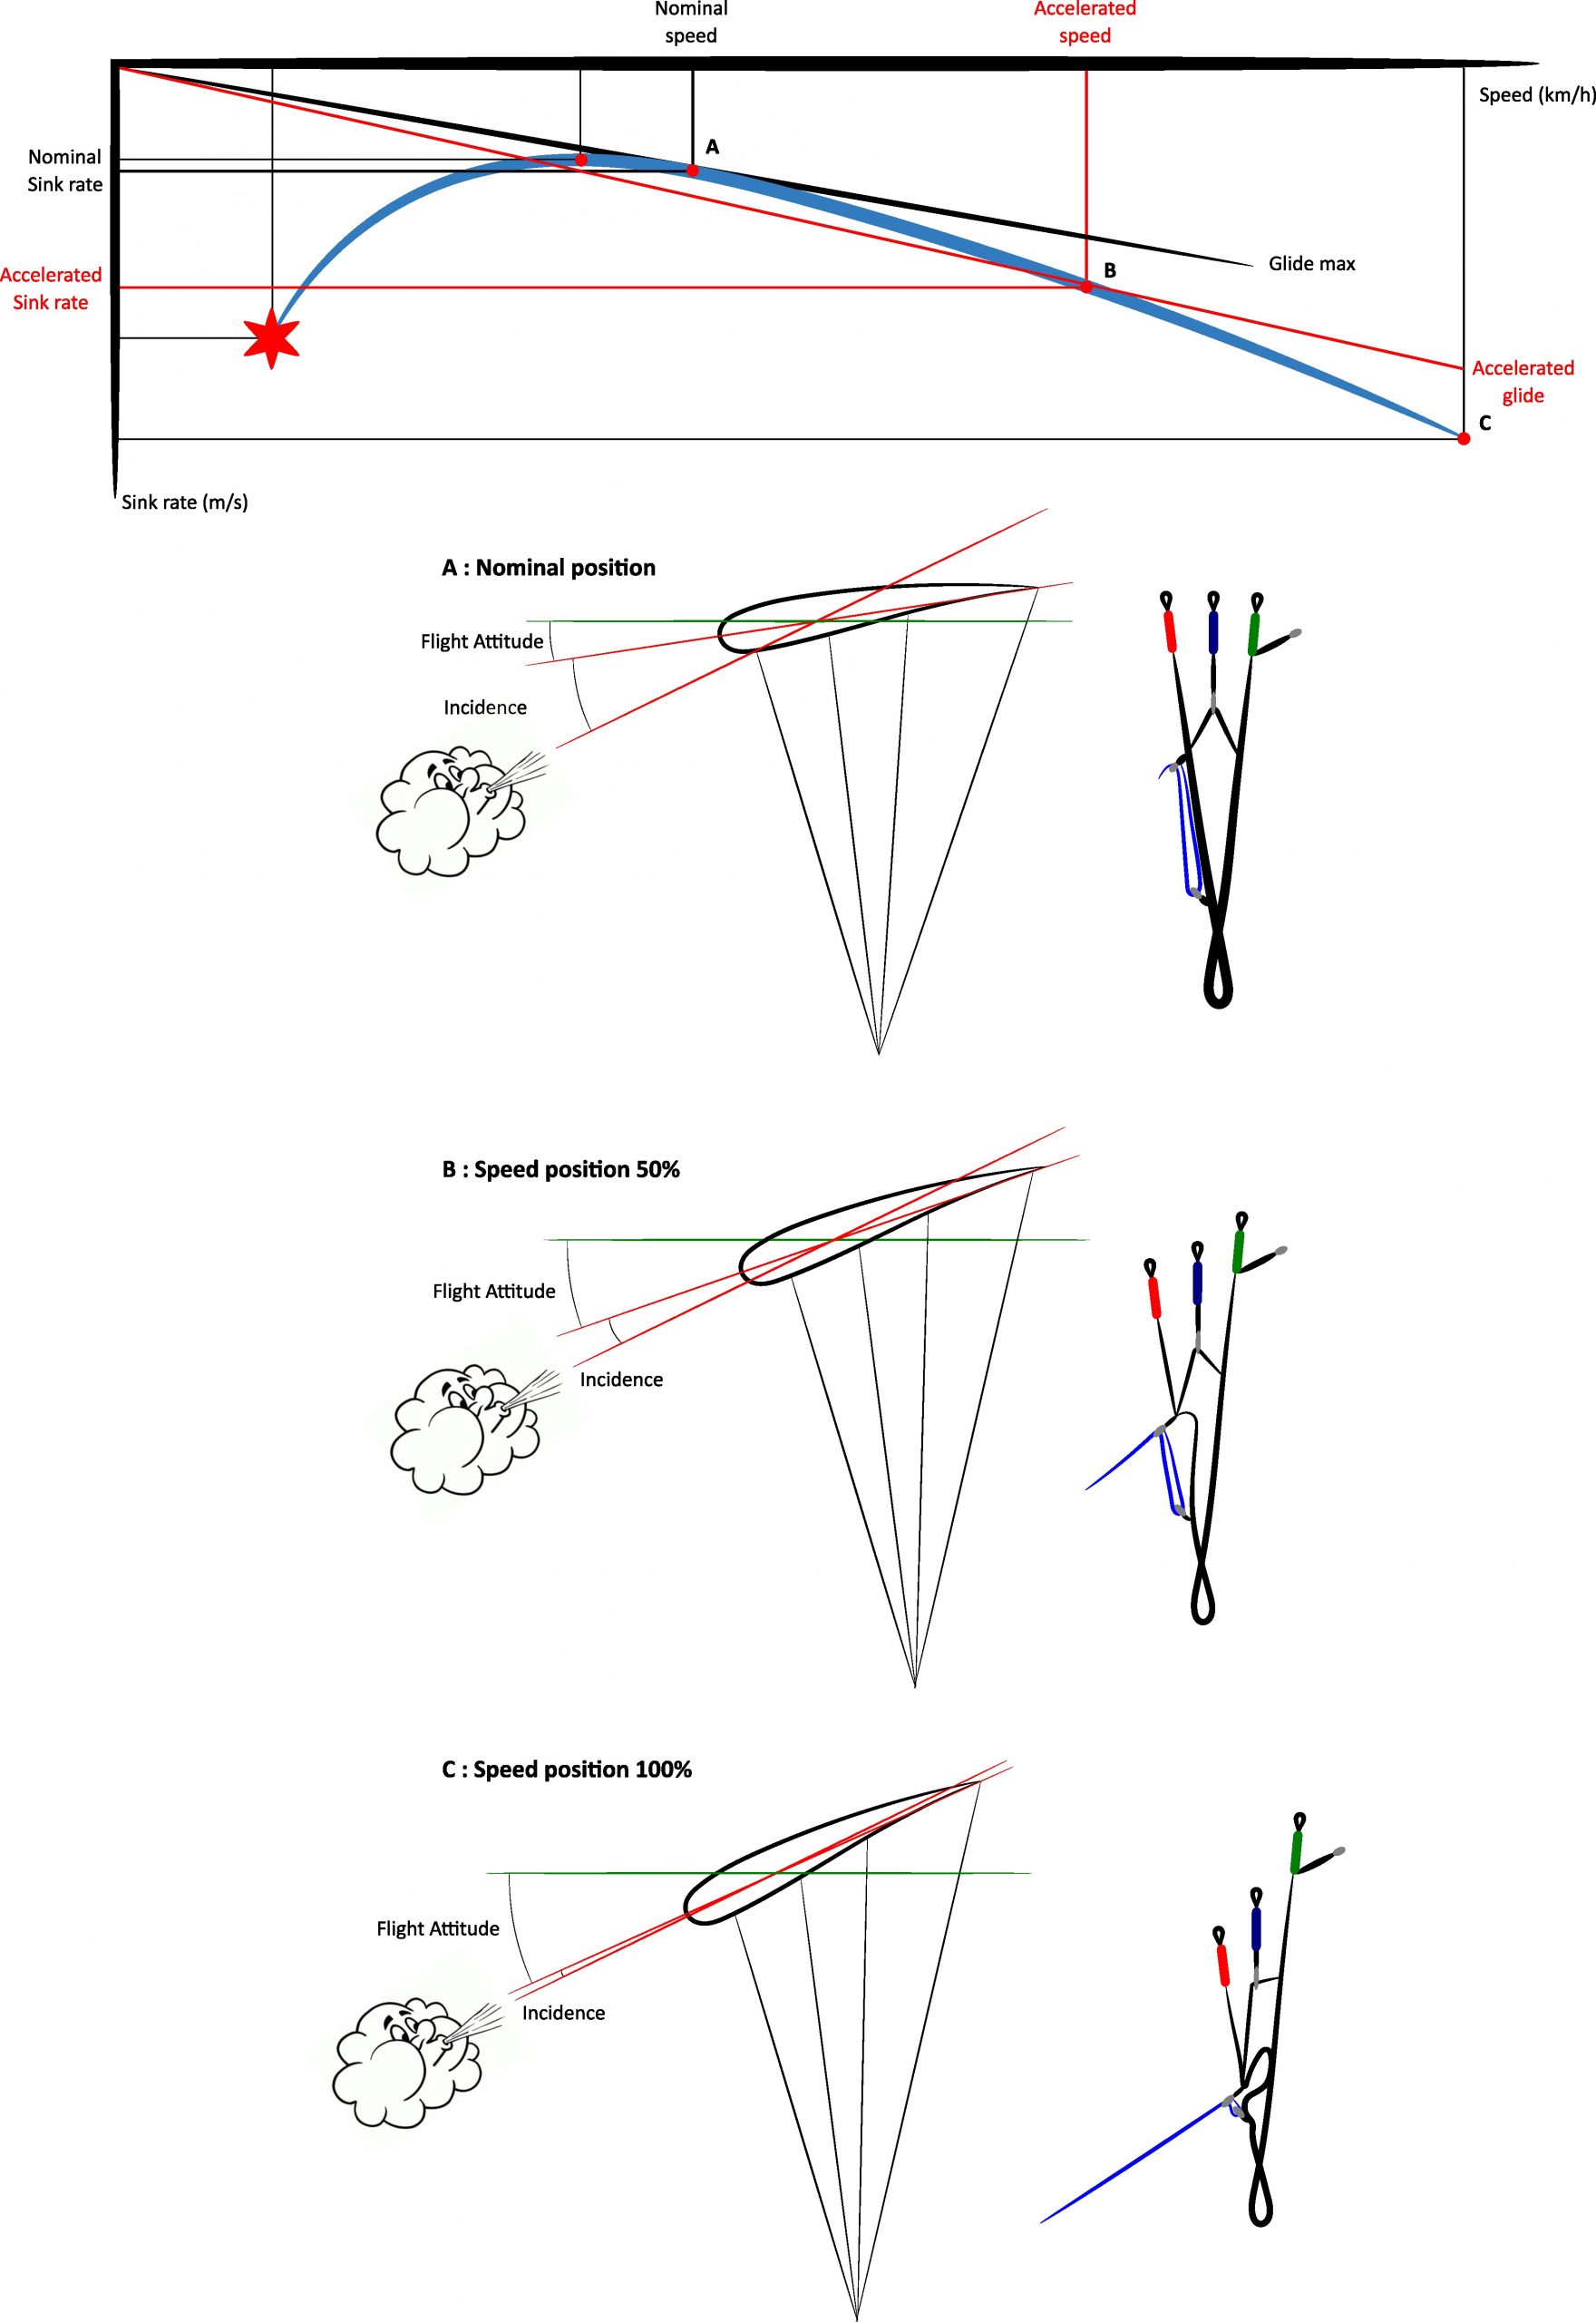
By pushing on the bars with your feet, the pilot acts on the lines which activate the system installed on the risers. This system will increase the pitch angle and generate an increase in the airspeed of the wing. The A / B / C risers are shortened linearly or not. Some systems even release the rear risers when the front risers are lowered. But this system was quickly abandoned because in case of frontal closure the phenomenon was amplified! The 2-pulley system (in blue on the diagram) reduces the effort required of the foot.
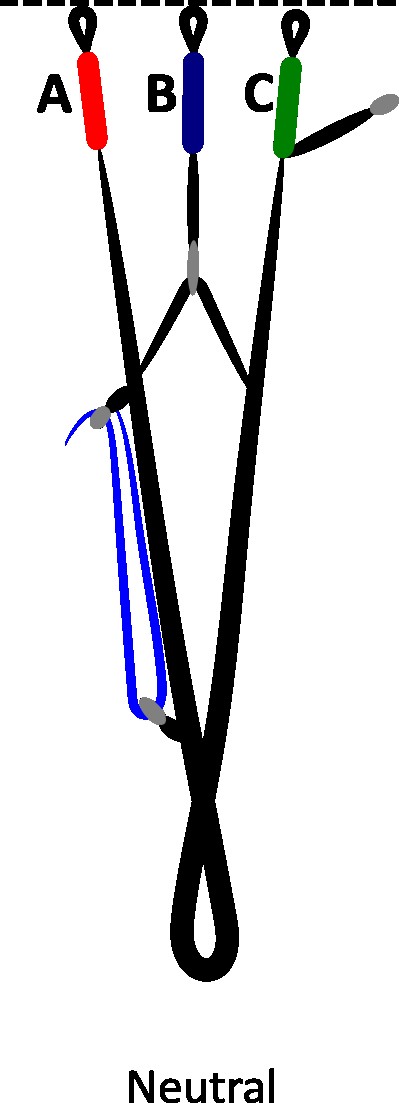
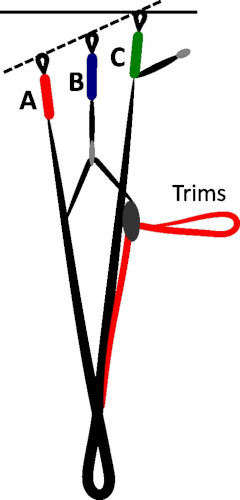
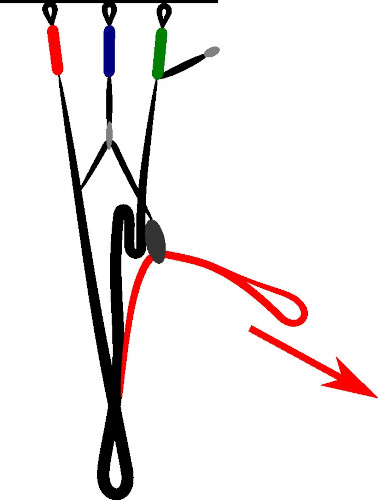
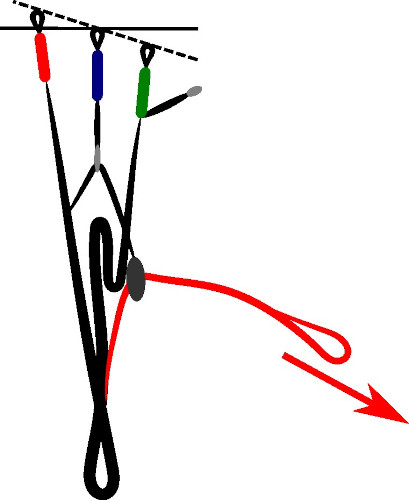
Trim tabs work in exactly the same way, but are manually operated and allow you to lock the risers in a certain position. They are generally used on wings where the use of a speed bar is complicated or simply impossible, such as in tandem or speed-riding (because of the skis!). They can also be found on paramotor wings. The trimmers can be used to trim the wing more nose up or more nose down. They are positioned on the back or on the front, and sometimes on both. Their location and action are totally linked to the purpose of the wing.
In tandem for example, this allows to adapt the flight speed according to the weight of the passenger. Or to make a glider more lively at take-off if there is wind.
CAREFUL!
The trimmers can offer a relatively precise adjustment, but since they have to be operated by hand, they can present a major disadvantage in case of a collapse because the management of the wing will have to be done with the brakes: the hands will therefore already be quite busy! You will therefore have to manage a wing in a more nose-up or nose-down configuration, and therefore potentially less easy to recover in stabilized flight. With a more nose-down stall, the wing will be much more lively and the collapses more violent.
III - Action - Reaction !
All you have to do is use the speedbar or trimmers to change the trim and pitch, and allow the glider to gain speed. There are many complex interactions between the pitch and incidence angles. In our case concerning acceleration and speed increase, we will simplify and consider that the more the trim is prone, the lower the angle of incidence.
When we accelerate, we move towards the right a point along the polar curve. Accelerating will thus have as direct physical consequences (Cf polar curve of the speeds):
1.- To increase the air speed
2.- To change the air glide ratio
3.- To increase the sink rate
4.- To reduce the angle of incidence
More generally, flying a wing at a faster speed will accentuate all these effects, including collapse reactions. The approvals require our gliders to undergo all kinds of flight incidents at cruising speed (nominal trim), but also at different accelerated speeds (modified trim). The effects of these flight incidents are all the more violent as the speed is higher. The management of these accelerated incidents will therefore be more complicated than at cruise speed. It is interesting to look carefully at the certification reports to determine the cases that have finally classified the wing in such or such category (A / B / C / D). One case may be enough, such as a large asymmetric collapse with the speedbar pushed to its maximum. This is not necessarily a common occurrence, but it is something to be aware of.
As soon as you reduce the angle of incidence, you will notice that the air streams will attack the profile more and more along the axis of the wing (decrease of the incidence), and that the risk that they pass over it (negative incidence) and cause a collapse increases. The wings are set up so that this does not happen in calm air, but more "tonic" aerological conditions are quite favorable to this kind of inconvenience. This is one of the only risks in using the speedbar.
IV - The speedbar: a tool for active piloting :
The main tool on a paraglider to control the different movements are the brakes. They allow to manage the 3 axes (roll-yaw-pitch). They are also used to manage the wing speed, but to a very small extent and mainly to slow down. When we want to gain speed, we have very little room for manoeuvre if we only use the brake handles.
But there are many situations where it can be interesting to be able to gain speed according to the aerology, for example in the case of a poor analysis of the conditions at the time...
The 4 consequences of the use of the speedbar (Paragraph III) can then become precious allies, together or independently.
There are 2 ways to use the speedbar:
- As a safety tool
- As a performance tool
IV.1- The speedbar as a safety tool :
First, consider the speed bar as an additional safety feature to your paragliding equipment. Theoretically, you should not find yourself in aerologically problematic situations, but who knows? It may well come in handy if you need to accelerate and take advantage of some of the consequences (see above). It is not necessary to carry out this experiment in a safe environment (SIV type) since the glider is not supposed to go outside the flight envelope, but to begin serenely it is essential to carry out your first experiments in calm conditions, with sufficient height and far from any obstacle.
As we saw with the speed polar, accelerating can help degrade the overall performance of the wing, especially near its maximum. Therefore, "getting away" remains one of the main reasons to use the speedbar as a safety tool. To get away from an "unpleasant" area more quickly, to avoid getting sucked into the cloud, or simply to fight the wind (or breeze) and get to the intended landing. The speedbar can also be combined with certain descent techniques such as big ears to make them even more effective. It is imperative that you seek professional advice to learn more about these descent techniques and their implementation.
IV.2- The speedbar as a performance tool :
Less interesting on "leisure" wings because they generally have their best performance in hands up (especially glide ratio), the speed bar becomes indispensable on competition wings to optimize the different flight regimes according to the conditions encountered. Performance wings have a "flatter" polar, which allows them to use the speed bar while keeping their best glide over a more or less important range.
In competition or cross country, or more generally in performance flying, you have to juggle constantly with the objective set, the timing, and the aerological conditions encountered. Sometimes it is better to lose glide ratio in order to arrive more quickly in a generous lift, or sometimes it is better to optimize your sink rate to gain height in thermals before moving on to the next terrain. The cases are numerous and varied and could be the subject of an entire course, but this is not the purpose here. For those who would like to go deeper into the subject, I recommend the excellent video by Baptiste LAMBERT on the Mc Cready. To simplify, you can remember that when facing the wind, the speed bar improves your glide ratio and your speed over the ground. In accelerated transition, successful pilots even learn to control the pitching motion of their wing by playing with the speedbar, pushing or releasing at appropriate moments. When this is not possible, they use the rear risers because it generates less drag than using the brakes, and allows them to maintain maximum performance. We will see later that the use of the brakes is not recommended when the speedbar is applied.
V.- Precautions :
As we have seen before, the use of the speed bar is not that complicated, but its use does influence the flight. It is therefore essential to follow the instructions below to be able to use it serenely:
- The speedbar must be set correctly to allow safe and optimum use. The first thing to check is that the length of the setting is not too short and will not activate the system without voluntary action by the pilot. The risk is to find yourself in flight with a permanently accelerated wing. In order to use it throughout its full range of travel, the two pulleys on the risers must be in contact when the legs are extended. If this is not the case and there is still some travel left on the pulleys, it is not a big deal, you can simply adjust the next flight. In general, the adjustment is not easily accessible in the air and you will need to spend some time in the gantry to fine tune the adjustment and refine it after a few flights to measure the adjustments to be made in real conditions (lengthen / shorten / symmetrize). It is important to use the risers of the wing concerned to make the adjustment, and not the pulley system that may be present on the gantry straps because it is potentially different (dimensions). In "performance" use, this adjustment is particularly important since it will allow you to adjust each flight regime according to the bar used, in relation to the polar of the wing concerned.
- During the pre-flight check, it is important that no lines (especially unsheathed lines) are caught in the system, especially if the connection is made with split hooks. It is possible for thin lines to get caught in it. In this case the take-off must be interrupted. We recommend that the speed bar halyard be connected to the slotted hook on the risers at the lark's head. In this case, there is no tension on the hook and it is less likely that a line will get caught. The lark's head connection is just as quick and safe to use.

- In the event of a collapse, it is important to immediately release the speedbar so as not to amplify the effects induced. The same collapse (type and amplitude) will be more violent and complicated to manage when the speed bar is maintained. In addition, the reduction of the angle of incidence during acceleration makes the glider more fragile and sensitive to collapse. You must therefore be particularly careful near the ground and the terrain. If you use trimmers, it will be very complicated, if not impossible, to neutralize them quickly in case of collapse, and you will have to manage the situation more carefully.
- When using the speed bar, it is imperative that you do not touch the brakes or you risk triggering a collapse! This may seem paradoxical, but it is true. Without going into too much detail, the action of the brakes will generate a depression towards the trailing edge which will then lead to a retreat of the center of thrust. To realign this new center of thrust with the pilot's center of gravity (pendulum system), the glider will have to move forward and dive: risk of accelerated frontal! This explains why the brake length adjustment is so important. If the brake length is too short, the trailing edge may be deformed when using the speed bar and lead to an accelerated frontal collapse without the pilot even having had any voluntary action on the brakes.
And if you feel the need to brake, why did you accelerate ? Well, to hold the glider, of course, if the conditions are a bit turbulent. How can you do this if you are not allowed to touch the brakes anymore? It is possible to hold the canopy thanks to the rear risers, often equipped with small handles (at least on recent wings). By acting on them, you can hold the wing without risking collapse. To steer the wing in accelerated flight (without using the brakes), it is recommended to add harness steering to the use of the rear risers. For more experienced pilots, it is also possible to prevent collapses by using the speed bar to control the pitch.
Conclusion:
You shouldn't think of the speed bar as something scary and complicated. It's a relatively simple tool, and it's worth spending a little time getting to know it so that you can use it with confidence when you need it. It is important to take the time to install it and to adjust it correctly: its efficiency will depend on it in case of need (a bit like the emergency parachute...).
Now you've read enough!
Go fly and don't hesitate to test your gas pedal to make it your best ally!
